Local sewerage with its own sewage treatment plant will allow not to break away from civilization in settlements that do not have basic infrastructure. If you make a septic tank yourself from barrels as an object of cleaning, the cost of improvement will be minimal. But for a successful result, technological subtleties are needed. Is it true?
To everyone who wishes to acquire an autonomous sewage system on their own site, we offer useful information that thoroughly illuminates all aspects of its construction. The practical application of the information provided by us is a guarantee of long service life and flawless operation of the system.
An interesting article presented to your attention introduces various constructive types of home-made septic tanks. It describes in detail the technology for constructing a sewage treatment plant from waste barrels. Construction methods are illustrated by simplified graphics, photos and video applications.
The benefits of a homemade septic tank
Despite the fact that manufacturers offer a fairly wide range of treatment systems, the design and construction of home-made septic tanks (for example, from barrels) is quite relevant.
The option of a hand-held device is in demand for the following reasons:
- the ability to minimize costs by acquiring components, as they say, at random - where it’s cheaper, secondly, using existing means at hand;
- installation of equipment can be carried out according to the so-called modular scheme, having preliminarily considered options for complementing and complicating the system.
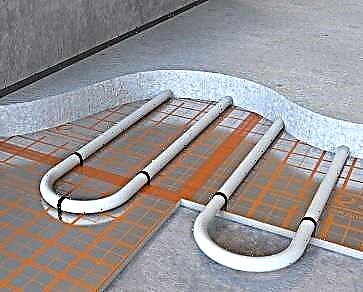
Let's say you first equip a toilet. In the future, you connect a bathhouse, a sink in the kitchen, even a sink in the garage to the cleaning system. Of course, this will only be easily feasible if the “tie-in” points are ready in advance — pipe bends that have been temporarily reserved on the surface or adjacent to it.

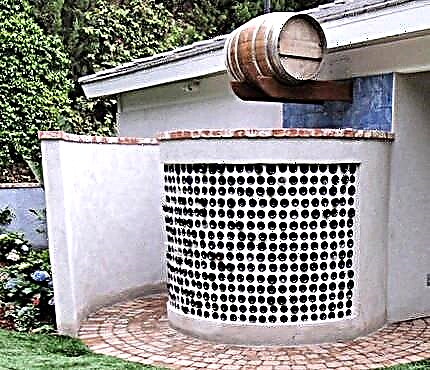
The construction of a septic tank from barrels will allow, at minimal cost, to organize an autonomous sewage system with the disposal of neutralized and clarified effluents
No one better than the master who built the septic tank knows the weak points of the treatment system and its capabilities. Although it is not worthwhile to make shortcomings, only he will take them into account during operation.
It is no secret that manufacturers and sellers of any equipment, as a rule, do not inform buyers about the shortcomings, “sticking out” only the advantages of the septic system. An independent builder will know what can fail him.
Knowing the approximate norms of water consumption by the family, given the frequency of residence and the features of the site around the house as a whole (type of soil and groundwater), you can avoid both unnecessary effort and money, and “accidents” caused by poor throughput of the cleaning system.

The septic tank from barrels works on the principle of multi-section sedimentation tanks, which ensure, as a result of overflowing and settling, the separation of effluents into water and silt. After leaving the septic tank, water clarified and purified to 65% is discharged into the soil, and sludge accumulates at the bottom of the sump until pumped out
You will learn the subtleties of the construction of a septic tank that works without smell and does not require pumping out from another popular article on our site.
Varieties of designs and schemes
The self-made septic tank constructed from barrels represents several capacities (chambers) installed in the given order. They are sequentially connected to each other by nozzles so that the sections are filled in a strictly defined order. This is achieved by installing cameras at different levels in height.
The principle of operation of a multi-chamber septic tank is similar to the principle of operation of a cesspool with overflow. The entry and exit of pipes into the chambers is done in such a way that the water begins to flow into the next tank, before the water level rises to the inlet pipe.
Gradually accumulating in the chamber, the water settles. The heaviest particles of contaminants settle at the bottom of the tank, smaller and lighter ones continue along the system.

For the free flow of waste mass to the septic tank and from chamber to chamber, the sewer line is arranged with a slope. The slope must be observed at each site, including on the segments between the sections of the septic tank
In order for the methane generated during the processing of effluents to be able to be freely removed from the system, it is necessary to arrange ventilation. It is installed vertically at the exit from the house or at the exit of their last section of a home-made septic tank.
In addition, on the drain of water from plumbing fixtures, sinks, a toilet bowl, a shower cubicle, etc., it is necessary to provide a siphon - at least made in the form of a "knee" - so that an unpleasant smell does not poison the existence.
The principle of operation of the septic tank is based on the gradual separation of solid insoluble components and the liquid component of the effluent. This number of sections passes through the sewer mass, the higher the final degree of purification.
The most common is a three-section scheme of a septic tank used for processing gray and brown sewage streams. However, if it is necessary to purify contaminated water coming from a bathhouse or kitchen, the use of one or two sections of barrels will be sufficient.

Treated and clarified sewage from a septic tank flows into the soil post-treatment system, for example, it is disposed of through a filtration field
From the last barrel, an exit to the filtration field is arranged, which completes the cleaning process. This post-treatment system is an underground structure assembled from perforated pipes - drains.
The drainage pipeline is laid in trenches specially selected for them, laid with geotexil, on top of which pipes are laid and a sand-gravel mixture is filled.
The function of ground treatment of gray effluents supplied by baths, washing machines, kitchen drains, etc., can be safely entrusted to an absorption well built in the extreme barrel of the sewer system. In this case, the bottom of the tank is cut out, and it is filled with gravel and sand so that the layer of this backfill is at least 1 meter.

If the amount of effluent does not exceed 5–8 m³ / day, then as a soil post-treatment system, you can use the third section without a bottom, filled with a layer of 1 m sand and gravel. Using this method, absorbing (filtering) wells are arranged.
As you can see, the scheme is quite simple, but its implementation in practice will require a lot of physical effort. Particularly time-consuming work is associated with the development of a pit for a septic tank section and trenches for a sewer pipeline.

The calculation of the volume of wastewater is based on the rate of discharge of wastewater per person in l / day. A single-chamber septic tank is built with a waste mass volume of up to 1 m³ / day, a two-chamber septic tank is built at 5 - 8 m³ / day
Construction of a septic tank made of plastic barrels
Homemade treatment plants can be divided into groups according to the material from which the chambers are made, these are septic tanks:
- from plastic barrels;
- from the served European cubes;
- from metal containers (welded cubes, cylindrical barrels);
- from concrete rings;
- from car tires.
The metal tank has greater rigidity. In addition, it is easier to fix from floating. But the main disadvantage of iron barrels is their poor ability to resist corrosion.
A septic tank made of concrete rings requires the use of special equipment in the construction of sewer wells. It is difficult to provide a cleaning point made of tire covers with the proper degree of tightness, if there is no experience with similar materials.

The use of plastic barrels in the septic tank allows you to do without lifting equipment and without welding
A homemade septic tank made of plastic barrels has more advantages:
- light weight, which facilitates transportation, installation in the pit and assembly;
- resistance to corrosion. This point is important not only from the point of view of reducing the hassle associated with replacing tanks, but also as an additional guarantee of cleanliness on the site;
- optimal construction method, as installation of the system does not require electric welding;
- tightness of containers, due to which there is no need to carry out work on the waterproofing of the sewer structure;
- manufacturability of the source material. Polymer containers are much easier to handle with cutting tools.
If necessary, light cutting flaws can be easily fixed using cold welding.

Plastic barrels - the easiest to use, technologically advanced source material for the construction of a homemade septic tank
Basic placement requirements
In the event that you have to obtain permission to install a septic tank in regulatory authorities (SES, etc.), then carefully study SNiP No. 2.04.03- 85. SNiP - "Building Norms and Rules" - a document similar to the standard (GOST), and it is the specified one that establishes the basic rules for the construction of external sewage networks and treatment facilities.
Sanitary requirements are regulated by SanPiN - Sanitary Rules and Norms.
In any case, adhere to the following requirements for distances from the septic tank to the following objects:
- the foundation of the house is 4-5 meters;
- well, well - 30-50 m;
- lake, pond - 30 m;
- bushes, trees - 2-4 m;
- road - 5 m.
Before installing an autonomous septic tank or a cesspool of plastic barrels, the place of its placement must be discussed with the owners of neighboring plots. Although the norms stipulate a distance from their fence to a septic tank of 2 m, the owners of a nearby estate may not be happy with the proximity of the sewer structure.
If the bottom of the structure is deepened below 5 m, it will be necessary to obtain building permits from the local administration.

The greater the volume of wastewater processed in the septic tank, the further it should be removed from the foundation
But even if permission is not required, consider the features of the site. It is pointless to arrange sewage with soil post-treatment systems in clay soils that do not have the necessary filtration properties.
The stagnation of flood waters during snowmelt and during periods of heavy rainfall will “tell” about the lack of water permeability. This means that clay soils prevail in the section and do not pass water through themselves and into themselves.
On clay soils, sandy loams, clays, loams, storage tanks are installed. They are made of concrete rings, plastic containers or a group of barrels. Accumulators only accumulate waste mass for pumping out with sewage trucks, but do not process them.
A similar decision should be made if the groundwater level is close to the surface. Water-saturated soils will also impede the disposal of the purified and clarified liquid component of the effluent.

If the section of the site is composed of clay soils that are unable to absorb purified water, the idea of constructing a septic tank will have to be abandoned
Instead of a storage tank, a biological treatment plant can be installed. It cleans drains by 98%, which allows them to be dumped onto the terrain.
Features and design standards
Having solid experience in the construction of such systems, all the required calculations can be done "by eye". But drawing up a detailed plan and developing a project, at least in the form of a sketch, can be of great benefit.
First, by determining where to install the cameras and laying the trunk, you will accurately calculate how much and what materials you need to purchase. If time is running out, then before you start work, it’s quite possible to get some of the necessary for free.
And legal - people, as a rule, easily part with things that they consider to be trash. It has already been tested more than once in practice that it is possible to assemble even a car by spending means comparable to the price of, say, a new bicycle.
Secondly, the careful implementation of the sketch contributes to the adoption of new decisions, as well as disciplines. In addition, a high-quality drawing on a scale can reveal the shortcomings of the original design and protect it from unnecessary expenses. It may well turn out that the scheme can be simplified by discarding the excess.

Designing a septic tank will help you accurately calculate the consumption of materials, think through the connection points and calculate the height of the barrels (+)
When drawing up a plan, focus on the following:
- even if you do not need official permission to install a septic tank, try not to violate the ecology of the site;
- the sections of the septic tank should be located so that between them and the foundation there is a minimum of 5 m - a distance that excludes the erosion of soils in case of emergency flooding of the septic tank and leaks;
- the sewer pipe route must be designed so that it is possible without turns, which contribute to the clogging of the pipeline;
- the external line of the autonomous sewage system must be provided with an inspection well for inspection and cleaning.
- for every 25 m of the sewer line, an additional viewing well should be constructed.
If the site is not happy with the dimensions, and the choice of place is a settled matter, then, if necessary, strengthen the walls of the pit.

To the level of seasonal freezing of soils, the septic tank and sewer pipeline must be insulated so that ice plugs do not form in it
If it is planned to erect buildings for the future, the functioning of which will require the use of water (a bath, a sink, some kind of handicraft production), provide places for “tapping” water drains from them into the treatment system. Moreover, the discharge of water from the bath can be taken immediately to the last chamber of the septic tank, since there will be no large particles of dirt in the wastewater.
If you do not intend to use the services of a scavenger, do not make the first chamber too bulky - so that it can be easily cleaned manually. In addition, provide for the possibility of easy dismantling of the camera, or access to its contents for quick cleaning.

For maintenance, operation monitoring and periodic removal of sludge, a septic tank must be equipped with a hatch. It must be at least 18 cm above the ground.
If, in accordance with the clay type of soil on the site, only the installation of the drive is possible, then design it in order to ensure unhindered passage of the sewage disposal equipment.
The depth of the trench must be calculated so that the slope of the pipes is 2-3 cm per 1 meter so that the drains spontaneously move to the place of processing and disposal.
Preparation of building materials for work
The main materials necessary for making a septic tank from barrels with your own hands should include:
- pipes for the trunk with a diameter of 110 mm;
- fittings, angles, etc., in an amount appropriate to your project.
- barrels themselves, designed for the septic tank. Select their sizes with the calculation of the approximate water flow in the house, based on direct observations.
It is advisable to use barrels with thick enough walls so that the joint of the pipes with them is as rigid as possible - otherwise the seam may lose tightness from mechanical stress.

To connect polymer parts, it is more convenient to use adhesives that must be compatible with the materials of barrels and pipes
Work in advance on the issue of freezing chambers at low temperatures. You can use the old rural way - put wooden sticks in containers.
At least, the ice expanding during freezing will compress the tree, which has “taken” part of the impact. Plastic bottles filled with sand will also help.
But in any case, the thermal insulation of the barrels will not be unnecessary - take care of the acquisition of available materials in the required quantity.
Support materials will also be required. Need to buy a sealant for sealing joints. For this purpose, do not use silicone, it will not last long, and you will not succeed in covering it with any protective layer - no coating will hold on silicone.
The best option would be to use a car body sealant - it has good adhesion (ability to stick), mechanical strength, and it can be coated on top with paint, mastic, etc. A polyurethane sealant has the best characteristics, but it is quite expensive;
It is necessary to purchase cement, sand, reinforcement - for pouring the bases under the barrels. The sand should not have any special requirements in terms of quality. Let it be with pebbles, it’s not scary, the main thing is not to include lumps of loam and organic pollution.
As steel fittings, any steel bars are suitable. There is no need to cook the reinforcing mesh - just fasten the rods with wire.

If during the development of the pit, soil was extracted with biological inclusions, lenses and layers of clay soil, then to fill the pit with a septic tank installed, quarry or river sand will be required
It will require crushed stone, gravel, gravel slag or similar materials to fill the bottom of the pit (pit) before pouring cement;
A plastic barrel is lightweight, and therefore, when the container is not full, it can be “pushed” to the surface by groundwater. To avoid this, prepare metal hooks, threaded rods - something for which you can “anchor” the barrel.
It is appropriate to use the sold threaded rods - it is convenient to make hooks from them, on the straight ends of which you can fix two iron plates with two nuts that need to be “drowned” in cement.
The device of the pit with a concrete slab
How do you decide to make the main foundation pit - manually or with the help of an excavator - decide for yourself. Calculate its area so that after installing the barrel in place, it is convenient to ram the earth, which is poured into the gap between it and the wall of the pit. It is also possible to provide for thermal insulation of the tank - slaggy, polystyrene - in general, with what will be more affordable.
Before pouring a concrete slab at the bottom of the pit, you need to check whether its depth is sufficient. To do this, you can install one of the barrels in the pit and see if there is enough depth for the construction of a concrete base. If everything is in order, you can begin to fill the bottom of the pit with cement. It is not necessary to do the formwork at the same time, but it is advisable to fill it with sand and tamp the bottom.
If there are doubts about the strength of the walls of the pit, then before pouring them they must be strengthened with a board. Then it is enough to fill the bottom with a thin layer of liquid cement. After it dries, you can lay the fittings and make the fill “clean” - with the horizon leveling. Do not forget about the mortgage embedded parts for anchoring barrels!
Mix cement with sand - 3 parts of sand per 1 part of cement. It is very convenient to use an electric concrete mixer, but acquiring it only for this work (if there are no plans for the construction of anything else) does not seem advisable. It is enough to choose a suitable trough, convenient for working with a shovel.
Mix sand with cement first without water - on the contrary, avoiding its premature ingress, and then gradually adding liquid, bring the solution to the required consistency. To prepare small portions of cement, you can work on a sheet of iron or plywood - if there is no trough. Before filling the foundation directly, moisten the backfill with water for sealing.

In order to anchor a light plastic septic tank into the concrete slab to be poured, it is necessary to lay metal staples
To level the fill, use a tool similar to a flat mop. While pressing the sole to the surface, smooth the solution with light translational movements. So, by the way, you will achieve better filling with the solution of the future site.
To prevent cracking of the mortar during drying, especially in hot weather, cover the flooded area with a dense cloth after the cement has set and pour over with water. For this purpose, tarpaulin or a similar synthetic fabric is better - here it is important not to wet the surface of the site, but to slow down the evaporation process.
Proceed with the installation of pipes when the barrels are installed, but not completely fixed. Only when the entire structure is assembled, can its elements be fixed. It is advisable to fill the barrels with water - for stability.
All these points are important to consider due to the fact that the final stage of the assembly will be the treatment of pipe joints and barrels with sealant - while it dries, it is necessary to ensure the structure is still.
Before applying the sealant, treat the places of its contact with plastic with a large emery cloth (No. 80-100) - for better adhesion and durability of the seam. By the way, triangular kerchiefs can be installed on the same sealant for rigidity, 3-4 pieces per joint, between the barrel wall and the pipe. Attach the kerchiefs with wire, masking tape, etc. while drying the sealant. - so that they do not "slip".

A schematic diagram of the preparation of the pit and anchoring of a factory-made septic tank can be used in the construction of a sewer facility with your own hands (+)
Having tested the system for water permeability, proceed to the final filling of trenches and pits. Tamp the soil gradually, filling the ground in layers. For rigidity, you can throw stones, bricks, etc. into the gap.
In those places where it is possible that equipment will run into the filled pipes and pits, before filling the surface soil layer, make a protective flooring at least from the boards.
Assembly and connection of the structure
So, all the materials are ready. The next step is cutting holes in the pipe barrels. It does not make sense to describe this procedure. The only thing that can be advised - do not immediately make holes in size - let the pipes be inserted with force, if necessary, cut the excess.
Next, you should take care of fixing the pipes in advance, otherwise when filling and tamping trenches and pits, the integrity of the seams can be violated. Pipes can be fixed using all the tools at hand — wire, board trim, bricks — anything.
Before digging trenches and pits, it would be worthwhile to assemble the entire structure without fixing details, arrange everything on the ground. Pipes can simply be laid on the ground next to the barrels. This will help to more accurately make markings on the ground. Having marked the contours of the highway and pits with lugs and twine, you can start digging.
Visual walkthrough
The process of constructing a septic tank with an overflow from the used barrels will provide a visual step-by-step instruction:
Image Gallery
Photo from
Step 1: Development of a foundation pit for installing barrels
Step 2: Forming Holes in the Barrels
Step 3: Fitting the flange to the holes in the barrels
Step 4: Cutting holes in the lower barrel
Step 5: Side hole in the upper barrel
Step 6: Install the receiving chamber in the pit
Step 7: Design a recess for the second barrel
Step 8: Filling Gravel As A Filter
In the first part of the installation work, the preparation of the components of the septic system and the installation of the receiving tank in the pit were carried out.
Next, we carry out the device of the camera, which performs the functions of an absorbing well:
Image Gallery
Photo from
In order to create a tight connection, fittings and other connected parts are seated on glue compatible with the material of sewer pipes
At the second barrel, cut the bottom, then immerse it to the mark that allows you to connect to the receiving barrel
Having fitted all the details of the system to each other and making sure of the accuracy and correctness of installation, we process the joints with a gluing compound
We attach a plastic outlet to the flange installed in the cover of the receiving chamber, to which we connect the sewer pipe
We insert plastic bends into the holes cut in the second barrel, check their location
To introduce pipes into the bends, rotate them in the holes so that the pipes are located almost horizontally
In order to improve the outflow of clarified water from the absorbing well, drainage pipes leaving it should be laid with a slope. To ensure a bias we install a peg
To facilitate the work on marking the slope and installing pegs, we will make a device by attaching a construction tape to one of the edges of the rail or building level bar
Step 9: Bonding Flanges and Fittings
Step 10: Connecting the Filter Chamber
Step 12: Processing Compounds with Silicone Glue
Step 12: Connecting the sewer pipe
Step 13: Installing Taps in the Absorption Section
Step 14: Pivot Taps for Pipe Installation
Step 15: Install the Drain Pipe Support
Step 16: Slope Checker
The steps for installing the reception and absorption chambers are completed. Now we proceed to the construction of a soil post-treatment system, for which we have already installed a beacon in the form of the first peg and made a slope-determining device.
Image Gallery
Photo from
In order to make backfill with the slope required for draining the effluent, we install beacons. First, hammer the pegs that mark the edges of the building level
We apply the measuring device to the installed pegs. If necessary, adjust their height to the instructions of the measuring device
We repeat the process of installing beacons until the area planned for the device of the soil aftertreatment system is completely filled
Focusing on the tops of the lighthouses, we fall asleep a gravel-sand mixture. We level it with a shovel until the required slope is formed
If possible, when backfilling a gravel-sand cushion, it is advisable to observe the gradation of the material with an increase in fractions from the base of the backfill to the top
On top of the backfill made with a slope, we lay drains - perforated sewer pipes through which the clarified water will be discharged into the ground
We connect drain pipes by cold or hot welding. There should be no bulges or tangible seams at the joining point.
To ensure tightness at the junction of the drainage pipes and bends, we glue them. If you think this is difficult, you can connect flexible HDPE pipes
Step 17: Installation of beacons for filling gravel with a slope
Step 18: Level the Beacons
Step 19: Installing a series of pegs
Step 20: Backfilling Sand Gravel
Step 21: the principle of gradation of backfill
Step 22: Install Drain Pipes
Step 23: Joining the Perforated Pipes
Step 24: Gluing Outlets and Drain Pipes
The installation of the septic system with a filtration field is completed, it remains to fill the pit with soil and put the structure into operation:
Image Gallery
Photo from
Step 25: Filling the pit with gravel
Step 26: Laying Over Geotextile Gravel
Step 27: Filling the foundation pit with dumped soil
Step 28: Filling the Barrels with Normal Water
Video # 1. The use of plastic barrels in the manufacture of a septic tank:
Video # 2. The final stages of the device:
Video # 3. The general principle of the organization of autonomous sewage:
When the homemade septic tank made of plastic barrels is ready for use, work out the rules for its use for family members. Be sure to insist that non-degradable objects such as rags, cigarette butts, and small items made of synthetic materials are not thrown into the sinks.
In the event that you will independently clean the chambers, you can prepare a waste pit in advance. Practice shows that the organic sludge extracted from the septic tank, mixed with earth and mowed grass, after three years turns into a good fertilizer for the soil.
Please write comments in the block below. Share your own experiences and useful information for site visitors. Ask questions about controversial or obscure points.