A sink in the bathroom or in the kitchen is a household appliance that is closely related to the daily life of people living in an apartment, house, or cottage. It would seem that there is nothing easier than installing a sink and using it comfortably.
Note, as practice shows, even the height of the sink in the bathroom has an impact on the degree of convenience for the user, not to mention the other subtleties of installation.
We will tell you how to determine the optimal height of the sink, taking into account the design features of the devices and ease of use. Here you will learn how to pick up and install a siphon to a suspended sink. Based on our advice, plumbing work will be carried out perfectly.
Sink mounting height standard
If we turn to the standards for installing plumbing fixtures, in particular, bathroom sinks, they directly correlate with the physiological parameters of a person. Specific physiological parameters, in turn, are determined by the age (and gender) of people.
There is no single clearly established figure that determines the height of the installation of sinks for the premises of the bath or kitchen.
However, there are recommended basic distance values: floor - the upper horizon of the sink, with an emphasis on three age categories:
- older age, average growth (800 mm);
- young age, average growth (700 mm);
- children's age, average height (600 mm).
As a rule, construction organizations involved in social facilities adhere to these installation parameters. Kindergartens, clinics, schools, etc. - at such facilities, installation is carried out strictly according to the standard.

Installing a sink in full accordance with the parameters of standard requirements gives the bathroom owner additional amenities and comfort. An incorrectly calculated installation height alone is already threatening wet floors.
Owners of personal households (apartments, houses, summer cottages) often look through their fingers at the standard installation height of sinks in a bath. Here, installation is usually based on personal preferences and ideas about comfort. And yet, it is recommended to take the distance as the golden middle of the height: floor - the edge of the sink, in the range of 750-850 mm.
Image Gallery
Photo from
Standard sink height
Overhead sink with furniture cabinet
Connection to sewer outlet
Sink under a wall mounted faucet
About installation schemes for household sinks
Modern industrial production has launched the production of sanitary sinks of various configurations. At the same time, the variety of devices for bathtubs and kitchens affects not only the design component. The layout of sinks in bathrooms and kitchens may also vary.
So, the usual installation scheme for a simple sink provides for the installation of two brackets on the wall. Then the device is simply “laid” on the brackets, the water inlet / outlet lines are connected and the end is connected.
However, even the simplest installation requires adhering to the established installation rules:
- Calculation of height: floor - the top edge of the bowl.
- Leveling the construction level on the horizon.
- Calculation of the optimal distance between the brackets.
- Easy-to-service communications supply.
Designs of earthenware (porcelain) plumbing fixtures are heavy and quite large. These factors should be considered during the installation process. Therefore, installation schemes for sinks in rooms with a bathtub are usually built taking into account all the expected loads.

The mounting brackets on which the sink rests are secured with screws designed to support at least twice the weight of the installed product. Reliable seating for mounting screws should also be made. The walls at the brackets should be strong
The diagrams indicate the methods of fastening and the parameters of the mounting hardware. For example, the same supporting brackets for a simple sink need to be fixed with screws (dowels, bolts, screws) of the appropriate size and load capacity.
Installation of sinks on a pedestal
Simplified suspension structures give property owners more freedom to manipulate installation heights. Regarding the models of sinks that are placed on a pedestal, such a benefit is no longer noted. The height of the installation of the shell-tulip here is tied to the height of the pedestal.
The so-called “tulip” limits the movement in height, but hides communications under the sink, while also serving as a support. The last two factors explain the popularity of such plumbing among the people.
Circuit solution for installation:
- choice of location;
- horizontal and vertical alignment;
- marking according to attachment points.
The recommended basic height setting for this type of sink is 850 mm from the floor to the top edge of the bowl. The distance from the floor surface to the points of attachment to the wall is 780 mm. Between the mounting points horizontally, the optimal distance is 280 mm.
The rules of installing plumbing with a pedestal in detail will be introduced by the recommended article.
The indicated values are relevant for medium-sized plumbing fixtures. Installing larger models will require adjustment. In any case, the documentation for the new device contains installation criteria for all sink sizes.

The installation of the bowl and the connection of communications are completed. The master can only put a pedestal under the sink, after which the system will be ready for operation. Thanks to the pedestal, the details of technical connections are hidden, which is equally important
Typically, fasteners and mounting hardware are included with the device. In the absence of those, they can be bought separately. A standard mounting hardware kit contains a pair of gaskets and as many screws with dowels.
It should be noted that there are commercially available models of sinks in the bathtub with pedestals of a decorative nature. This design eliminates the function of the pedestal as a supporting component. It just closes the sink siphon and the connection points to the communications.
Installation of plumbing with a decorative pedestal is as follows:
- A sink is attached to the marked surface of the wall.
- The mixer tap is installed.
- With flexible hoses, the device connects to the cold water / hot water lines.
- Mounted siphon system.
- A pedestal is set according to previously marked landmarks.
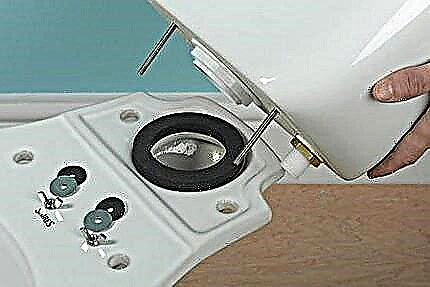
Fixing the sink to the wall does not seem to be a difficult process. But here it is important not to pull the hardware. Earthenware or porcelain is a fragile material. The standard installation scheme for installing sinks in the bathroom provides for fixing with two screws.
There are special holes on the back of the device for this. The softness of the suspension (cushioning towards the wall) is ensured by silicone gaskets.
Moydodyr-style circuitry
Sophisticated wiring diagrams with marking and fitting do not threaten the floor moydodyr. This is one of those options for plumbing for the bathroom, which is actually done on a turnkey basis. That is why floor systems "moidodyr" won consumer sympathy.
The basics of the installation here are reduced to the assembly of a furniture cabinet with the subsequent application of a sink to the countertop. The installation height of the sink, in this case, depends on the height parameter of the cabinet. But, what is noteworthy, - furniture, as a rule, has supporting legs equipped with a height adjustment mechanism.

Convenience of devices of a series floor "moydodyr" is an obvious fact. In this installation, there is no need to mount the sink to the wall. However, there are devices of the same type that are mounted according to the wall suspension scheme
Meanwhile, there are also constructions of moidodyr of suspended type. Moreover, there are two types of such products - for installation in the area of the corner of the room with a bathtub and for installation on a flat wall. Such a project will have to be installed according to the scheme of a full-fledged installation - with marking, drilling, the creation of fasteners.
True, with any installation of moidodyr, the standard sizes remain relevant:
- distance from the floor to the outlet point of the sewage system (510 - 590 mm);
- distance from the floor line to the points of the HVS and GVS conclusions (560 - 650 mm);
- the distance between the points of the conclusions of the cold water and hot water supply (80 - 150 mm).
As can be seen from the specified standard parameters, the height margin during installation manipulations is sufficient. Nevertheless, each sink of a particular moidodyr model is often distinguished by individual circuit designs. Projects contain several components, and the sink is just one of them. Moreover, there are models of sinks with a place for a mixer tap or without it.

This shows one of the possible mounting schemes for the mixer tap on the underside of the bathroom sink. Two studs, a thrust washer and two M6 nuts are used. Also often used is a single nut M22
The installation and connection of the mixer tap is carried out in the traditional way:
- to put on a trailer with a gasket;
- insert the mixer tap into the hole in the sink;
- put a second gasket on the trailer from below;
- screw and tighten the lock nut;
- connect flexible hoses to the hot water / hot water lines.
According to the standard scheme, the siphon output with a sewage line is also connected. Typically, a corrugated tube with a diameter of 40-50 mm is used for these purposes.
Rational installation of water lily sinks
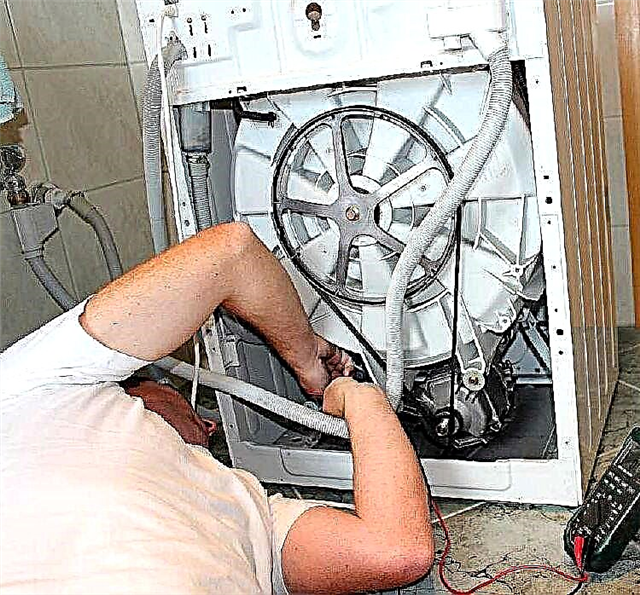
The installation scheme with the rational use of the space under the sink is seen as interesting. Obviously, this space can be used with advantage to place any household equipment related to the bathroom.
For example, place a compact washing machine there. It is only necessary to choose plumbing of a suitable configuration.

Such sinks include models of the waterlily series and similar. Design feature - the drain pipe is located as close to the rear wall of the device (in the center, left or right). Flattened bowl shape (height 130-160 mm)
If you plan to place it exactly under the sink of the washing machine, it is recommended to choose models where the horizontal scheme of the drain pipe is used.
But the recommendations here are justified by the fact that a horizontally located drain pipe allows you to push the machine more tightly against the wall. That is, the use of free space turns out to be the maximum possible.
Judging by the operation, the horizontal drain scheme is not entirely successful. This arrangement is fraught with frequent congestion.
Both in terms of design and in terms of comfortable operation, the wiring diagram for installing water lily sinks requires a clear combination of two objects in overall dimensions. That is, the width and length from the back wall to the end of the sink and the washing machine should be almost level.
An even more convenient installation option is a project where the length of the water lily sink extends 50-60 mm beyond the front panel line of the washing unit.

Installation scheme with the rational use of the free space of the bathroom. This option is especially relevant for small rooms, where every square meter is in short supply
Installation of a plumbing fixture is necessarily carried out on special mounting brackets. There is always a small gap between the top of the machine and the bottom of the sink, allowing you to freely move the machine if necessary.
The optimal size is considered to be the height for the washing unit, equal to 650-700 mm. With these parameters, it will not be difficult to install a sink within the boundaries of standards of height 800-850 mm.
Siphons for water lilies are slightly different in size (they are smaller), but the installation scheme is no different from the usual version.
Countertop sink as a single project
To accommodate a washing machine in tandem with a sink, schemes for an integrated solution began to be proposed not so long ago. The design of two different elements makes up a single whole.

The functionality and amenities of such solutions are attractive, but their purpose is large bathrooms. If desired, you can get a draft of an individual plan. However, the cost of such solutions is not available to everyone
The choice of such designs is limited to two options:
- countertop as a unit with a bowl;
- countertop with mortise bowl.
This design is installed in the same way as it is done with devices of another type. For example, if there is a countertop with a mortise sink, the board is installed first, then the bowl of the sink is superimposed.
The tabletop is laid on mounting metal corners. The location of these elements is pre-marked taking into account the future location of the upper part of the countertop at around 850 mm from the floor.

Durable corner brackets and wall corner supports are needed to secure the sink-countertop circuit elements. Such projects are usually built on stone countertops, the weight of which requires reliable fasteners
The supply of communications is performed based on the power supply of the washing machine and sink, as well as taking into account the load on the sewage system from two devices at the same time. The entry / exit points of communications must correspond to the parameters indicated in the technical documentation for the machine and plumbing.
Installation dimensions standards are usually taken as follows:
- height from the floor to the top edge of the bowl (850 mm);
- height from floor to bottom of siphon (700 mm);
- height from a floor to points of HVS / GVS and sewerage (600 mm);
- distance between points of hot water / hot water supply (at least 150 mm)
It is recommended to mount countertops based on natural or artificial stone. Wood and especially plasterboard, even with strong protection against moisture, will not last long in a bathroom.
About how to install a false sink on a countertop, as well as how to correctly select it, is described in detail in the next article.
Siphon wiring diagrams
Regardless of the design of bathtub sinks and how to install them, siphons are traditionally used:
- single turn;
- two-turn;
- bottle.
The use of a one-two-turn siphon is characteristic of “water lilies” when it is necessary to free up as much space as possible under the sink to accommodate a washing machine or other household items.
The name “one-two-turn” was obtained due to the presence of one or two pipe bends in the circuit. Due to such bends, a hydraulic shutter is created inside the line.

The principle of operation of siphons is the same, but the design is different. This difference allows you to connect sinks of various types to the sewage system without changing the recommended scheme
Another option - “bottle”, is the most common. It differs from the first one in the absence of bends, the functions of which are performed by a special “bottle” with a drain pipe outlet from the upper part of the structure. This scheme is more convenient than the first when performing maintenance - cleaning the line in case of congestion. At the bottom of the “bottle” there is a technical cap that can be easily turned off.
A few tips for installing the sink will help you set it at the right height.
Installation work on the installation of sinks inside bathrooms, carried out taking into account existing standards and schemes, is the key to convenience and comfort.
Existing parameters, values for height, width, length, etc.calculated based on operating practices. To some extent, one can depart from these parameters and values, but ignoring them completely is not recommended.
Tell us about your guidelines for selecting the height of the sink in the bathroom. Share useful information, opinions about the information we presented, photos on the topic of the article. Please write comments in the block below.