Home electrical network is a complex system of wiring products and devices connected by electric current conductors. In electrical panels, junction boxes and device cases, wires are connected.
We will consider how to connect wires without soldering using special clamps and terminals so that the switching is as reliable as possible and meets the safety requirements. Why give 4 detailed instructions with the best ways to connect electrical wires.
We will also supplement our material with useful installation tips from experienced electricians.
Briefly about possible switching options
Electricians use various methods of connecting conductors - from the simplest isolated twisting to crimping with special sleeves.
Some procedures require additional supplies and special tools, others are manual.
The question of choosing the most reliable connection methods became relevant when the load on the home network increased - a lot of powerful devices appeared, respectively, the requirements for the use of conductors and electrical installations were tightened.

Wire connection points are the most vulnerable points in the circuit. If the contacts are connected incorrectly, overheating and arcing occur over time, the wires can melt, flare up and cause harm to people and property.
Factors affecting the choice of method:
- total cross section of conductors;
- type and method of cable insulation;
- material of which the wires are made;
- purpose of the switching node;
- external connection conditions;
- degree of mobility of the compound, etc.
The on-site installer determines how he will make the switch, taking into account the above factors. Much depends on his skills in using a special tool (soldering iron, welding machine, crimping pliers) and materials that are at hand.
However, professionals always have an installation kit with them and use the methods recommended by the GOST and PUE standards.
Today you can come across a variety of wire connection options:
Image Gallery
Photo from
The oldest method that could be used to build low-load circuits. It requires a minimum of time, and from materials - only a coil of electrical tape. Twisting is considered a weak connection
Performed to increase the reliability of twisted conductors. Soldering requires solder, flux and a special power tool - a soldering iron. It is labor intensive and suitable for all types of connections
By contact heating, twisted conductors are turned into a single monolith. Cons - the use of a welding inverter, the complexity. Special skills and qualifications required
Plastic products for connecting only a pair of conductor cores. The wires are fixed in the box body with screws. The method is popular, economical, but not suitable for all types of wires
To connect two conductors, you will need a bolt with a nut and three washers that are installed between the cores and on both sides. Cons - a large amount, a lot of insulation is required, the connection may “loose” over time
Switching occurs not by tightening the screws, but by a spring connection. A well-known example of this type of terminal is the Wago product, which provides reliability and the ability to work with multiple conductors at once.
Multi-colored insulating caps with a spring device are used for fast and economical switching of conductors in distribution boxes, they are reliable
The connection crimped by the sleeve is considered one of the most reliable, safe and effective, but it requires more time for installation, a special tool and skills. One more minus - it is one-piece and cannot be repaired
Option # 4 - terminal boxes
Option # 5 - bolted connection
Option # 6 - Spring Terminals
Option # 7 - plastic caps
Option # 8 - crimping with sleeves
According to PUE 2.1.21, simple twisting should in principle not be used for switching. Only welding, soldering, crimping and various types of clamping devices are allowed.
There is not always special equipment at hand to perform soldering or welding, especially if the job is done by an amateur. Therefore, it is advisable to consider methods that are both reliable and affordable.
Safe and effective connections
Consider 4 options for connecting conductors suitable for home installation: spring terminal blocks, terminal blocks, PPE caps and crimping with sleeves.
To perform the work, consumables are required - terminals, clamps, sleeves, selected depending on the type and cross-section of the conductors. We recommend that you only purchase products from trusted manufacturers and not cheap Chinese substitutes.
Method # 1 - WAGO terminal block switching
The main advantage of terminal switching is 100% connection reliability. Thanks to the development of WAGO, screwless connections have received international standard status.
Now other manufacturers are engaged in the production of spring clips. They are used in high-speed cars, airplanes, mobile chains - that is, where special responsibility is required.

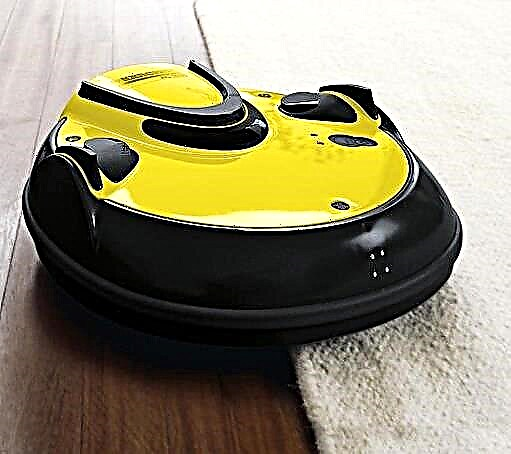
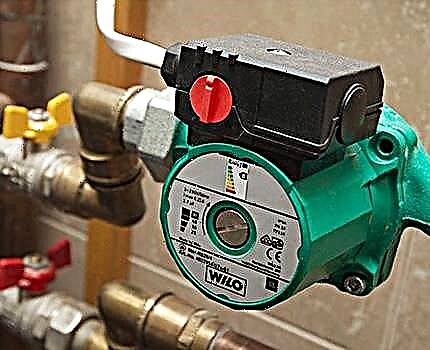
Spring technology allows you to connect various types of conductors: 1-core, multi-core, especially thin. This is in demand in everyday life when it is necessary to connect a lamp or gate control system, pumping equipment or a telephone

To install self-clamping terminals, it is enough to strip the ends and insert them into the holes of the terminal block as far as they will go - the number of conductors can be different in this case, by the number of holes. The locking mechanism is activated, and the cores remain firmly fixed inside the housing
To install the terminal block, you do not need to specially prepare. Experienced installers who value quality also have long been using only self-locking terminals.
We offer step-by-step instructions for connecting 2 conductors with a clamp of the 222 series, whose representatives are successfully used to connect branches of various types of wires:
Image Gallery
Photo from
Step 2 - hard wire entry
Step 3 - Prepare the Patch Cord
Step 4 - branch installation
After the correct execution of the actions, spontaneous opening of the terminal is impossible. The advantage of such a connection is the ability to disconnect. To open the conductors, you must first click on the movable mechanism, and then remove the corresponding conductor.
Terminal Connection Benefits:
- connection of single and multicore conductors made of copper or aluminum, as well as mixed connections;
- high quality connection;
- during installation, the wires are not damaged;
- the design provides for the removal of circuit parameters without disconnection;
- neatness and order in the places of work - distribution boxes, panels, wiring devices.
This method saves time - it only takes a few seconds. However, it requires accuracy. If the ends are not fully inserted, overheating may occur and the terminal block body will melt.
The main disadvantage is the high cost, especially branded products. For example, a set of 20 three-wire universal Vago terminal blocks costs about 500 rubles.
Method # 2 - using terminal blocks
Inexpensive plastic products have a clamping mechanism with which the conductors are fixed and connected inside the case. Each single or stranded wire is removed from insulation, inserted into a separate socket and secured by tightening the screw.

For installation work you will need two tools - a construction knife and a screwdriver. Instead of a knife, you can use a special modern device for removing the insulating layer - a stripper
Using a stripper to remove insulation allows even a novice to cope with this task without much difficulty.
Wires can be wound in two ways - on one side and on both sides, towards each other. This method is often used for desoldering in junction boxes, so manufacturers began to produce switch boxes with integrated blocks.

Terminal blocks differ in the size of the holes, which depends on the cross-section of the cores, as well as the number of sockets. If at hand a box of 12 pairs, and only 2 is needed, then the desired segment is simply cut with a knife
Advantages of connecting with pads:
- profitability;
- quick installation;
- aluminum / copper compound;
- high quality.
The main disadvantage is that only 2 occasions can be connected with one pair block. Experienced installers do not recommend using the shoe method for connecting stranded or aluminum wires, since a screw connection can destroy a more fragile material.
And one more minus - a large number of low-quality pads.
For a better understanding of this method of switching wires, we recommend that you look at what the terminal boxes are good or bad for:
Method # 3 - use of PPE caps
For the manufacture of spring clamps, caps use non-combustible plastic. The body material is an insulator suitable for mechanical and fire parameters.
To install the cap, it is necessary to prepare the cores, insert them inside, and then with an effort to make twisting movements. To protect the exposed parts of the cores from oxidation, the inside of the cap is treated with paste.

Inside the cap there is a metal spring of a conical shape, which moves apart under pressure, and then contracts and fixes the conductive wires
The caps are compact, have a simple device, so they are often used for desoldering. One distribution box includes up to a dozen products.
A practical example of the use of PPE for desoldering in a distribution box:
Image Gallery
Photo from
To get to the cores, with a construction knife we remove the dense polymer sheath - cut along the entire length of the visible part of the cable, then cut off a piece of separated insulation
The conductors released from insulation are divided into groups: zero (blue) - into one, grounding (green / yellow) - into the second, phase (brown) - into the third
It is inconvenient to connect long wires, and they will not enter the junction box, so we cut off the long ends with wire cutters. But we leave the pieces necessary for mounting the caps
Strippers clean the ends of all conductors to a length of about 10 mm. These parts of the cores will be brought inside the caps
To ensure a large area and high density of the joint, it is recommended to twist before installing the caps. For convenience, we use pliers
Caps come in different sizes, so in the process of preparing the cores, we specify how long the working ends should be, and then remove the excess with nippers
Hold the twist with one hand, with the other we wind the cap with effort. We perform this procedure 3 times - according to the number of connections (may be less or more)
When twisting, we make sure that the exposed parts completely go inside the caps, and only insulated conductors remain outside
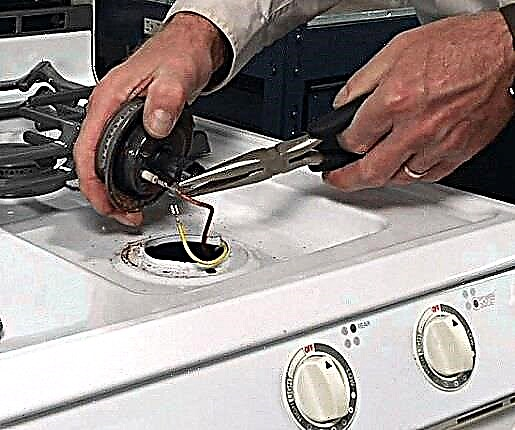
Step 1 - Removing External Insulation
Step 2 - wire distribution
Step 3 - Fit to Length
Step 5 - twisting the conductors
Step 8 - Quality Control
After completing the work on connecting the cores, carefully place the caps in a circle and close the switchgear cover. At any time, you can unscrew the spring elements and reconnect or repair.
Advantages of PPE:
- low cost;
- material - non-combustible polymer;
- high speed and ease of installation;
- variety of coloring.
The last item may come in handy when using old, unlabeled wiring. You can determine the purpose of the cores with the help of caps, picking them by color. We talked about color marking of wires in more detail in this article.
The main disadvantage is that the connection is considered unreliable. The spring force is not enough to ensure a strong connection, which is why additional twisting is performed.
Before use, it is recommended to check the quality of the products.
And further - PPE is not intended for switching aluminum / copper wires.
Method # 4 - crimping conductors with sleeves
This method is chosen by installers who really care about the quality of the connection. Crimping with a special tool guarantees an increase in contact area and minimal resistance.
If you cut the crimped sleeve in half, you can see that all the wires almost merged into one monolith.

It is crimping that is used for communications in distribution boxes, which for some reason will be masked outside with a cladding and will remain without free access
Cores can be started both on the one hand, and on both. In any case, their total cross-section should not be larger than the diameter of the sleeve.
In practice, more often choose a larger sleeve, and the free space inside it is “clogged” with pieces of wiring. The denser the sleeve is filled, the better the connection.
Step-by-step crimping instructions:
Image Gallery
Photo from
To crimp the conductors in the distribution box, it is necessary to select the diameter of the sleeve so that it includes all the wires - separately zero, ground and phase. The size of the product, as well as the material of manufacture, is indicated on the packaging
There are various types of crimping pliers. For the most part they use universal ones designed for crimping liners of various diameters. Here is the KVT PC, a model for crimping 1-wire conductors
We clean the conductors, since it is necessary to bring bare conductors without insulation inside the sleeve. To remove the insulation, we use either a knife or a stripper, which makes the cleaning process faster
Alternately, we wind the wires of one purpose, for example, "earth", into the sleeve so that on the other side small ends are visible. If the volume is small, add small pieces of wire inside for density
The free space inside the distribution box is limited, so all unnecessary must be removed. Here you need to cut the ends of the copper wires with pliers, leaving only the part protruding from the sleeve by 2-3 mm
We take pincers, we find a recess that is suitable for the diameter and crimping. The first is carried out at the edge of the conductors. The ratchet mechanism does not open until you squeeze the handle of the ticks to the end, with maximum force
Double indentation guarantees high quality of the connection, therefore we retreat from the place of the first crimp, install the pliers closer to the second end of the sleeve and again compress
The pressed sleeve must be insulated, as it is metal and conducts electricity. For protection, usually used either shrink material paired with a hairdryer, or ordinary electrical tape
Step 1 - Select Sleeve Size
Step 2 - selection of crimping pliers
Step 4 - Insert the wires into the sleeve
Step 5 - removing excess parts
Step 6 - first crimping
Step 7 - Second Crimping
Step 8 - Heat Shrink Insulation
If there is a shortage of space in the box and compactness comes to the first place, before crimping, the sleeve is cut in half and crimped only once.But this should be considered as an exception.
This method is considered inexpensive - each sleeve (copper) costs 8-9 rubles, and ticks can be rented.
The benefits of crimping:
- excellent connection quality;
- profitability;
- high speed of work.
The disadvantage is that the connection is one-piece, and if necessary it will be necessary to completely replace the switching units. If there is a supply of wires in the box, then the old sleeve is cut off and a new one is installed.
The downside is that without a special tool, it will not be possible to perform high-quality crimping.
Tips from experienced installers
There are many controversial issues both in connection methods and in the application of individual mounting products. But a number of rules apply to absolutely all masters who are involved in electrical installation.
For example, It is strictly forbidden to twist aluminum conductors with copper. The process of rapid oxidation leads to the destruction of switching and the emergence of a dangerous point that can spark or flare up at any time.
Some more important rules:
Image Gallery
Photo from
Correctly performed twisting
Maximum joint isolation
The Importance of Conductor Labeling
If the conductor is coated with an oxide film, it must be carefully removed with either contact paste or fine sandpaper. The diameters of sleeves, tips, caps, it is better to choose the size.

When using electrical tape, overlap the coils. One layer is not enough, it is better to walk along the connection 2-3 times, be sure to make the last turn on insulation
Single conductors in screw terminals are loose. Therefore, it is recommended to bend the stripped end in half or make an arbitrary loop out of it.
At the end of work, be sure to check the reliability of the connections - slightly twitch the wires. It happens that the switching is unsuccessful, and the core simply slides out of the terminal block.
If the volume of the distribution box allows, for example, the shields can hold many wires and devices, then leave the cable with a margin. Sometimes switching is required and an extra length comes in handy if the connections are one-piece or burnt.
We also have other articles on the site on connectors of conductors, methods of connecting wires of different sections and recommendations for choosing the best connector:
- Methods for connecting electrical wires: types of connections + technical nuances
- Terminals for connecting wires: which terminal blocks are better and how to work with them
- Wire connectors: the best types of connectors + what to look at when choosing a connector
Comparative analysis of various switching methods:
As you can see, equipping the electrical wiring, you can completely do without soldering and welding.
There are enough modern devices on the market to ensure the switching of conductors using safe and effective technologies. The choice of the method depends on personal preferences and material capabilities..
Choose a safe way to connect wires without soldering, but you still have questions that we did not touch on in our article? Feel free to ask your questions to our experts in the comments section.
If you have extensive experience in performing electrical work, in particular, connecting conductors without the use of soldering and welding tools, please leave useful recommendations for beginners and additions to our material below under the article.